Creating Custom Overlay Layout
Creating a Custom Overlay Layout in Sparkbooth
Your client wants a landscape layout with three photos as shown below:

This layout requires a background image and an overlay of a girl. The client has provided the background image and a photo of his son to be used:


Preparing the Background Image
The background image needs to be resized and cropped to 1200 x 800 to fit the 4 x 6 landscape layout size. We used IrfanView, a free photo viewing program with many features, to do this. Note: Paint.net can also be used for this.
Creating the Overlay Image
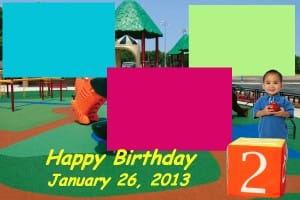
For the overlay image, we need to create a transparent 1200 x 800 PNG image, place the photo of the son in the bottom-right corner, and add the text "Happy Birthday" along with the date.
- Remove the Background: Use Paint.net to remove the white background color around the son. Use the Magic Wand tool to select the background, and press
Ctrl+Xto cut the background away.-

Blank overlay image with transparent background in Paint.net
-
- Create a New Blank Image: Create a new blank 1200 x 800 landscape image in Paint.net. Press
Ctrl+Ato select the entire image, andCtrl+Xto cut the selection, leaving a transparent background. - Add the Son's Photo: Copy and paste the image of the son into the bottom-right corner of the blank overlay.
- Add Text: Use the Text tool to add "Happy Birthday" and the date.
- Save the Overlay: Select File > Save As and save the overlay as a PNG file. PNG format is necessary to maintain the transparent background.
-

Finished overlay image with son's photo, 'Happy Birthday', and date text
-


Using Sparkbooth's Layout Editor
1. Open Layout Editor: Open the layout selection list and select one of the read-only landscape wide layouts with three or four photos (e.g., 4 x 6 Landscape, Wide).
2. Clone the Layout: Use the Clone Layout button to create a new layout. Name this new layout something relevant.
3. Remove Extra Photo Boxes: Select and delete any extra photo boxes if you only need three.
4. Add the Background Image: Under Paper Properties, click the paper clip next to Background, and select the background image you created and saved.
5. Adjust Photo Boxes: Resize and position the photo boxes to fit the new layout by clicking on them and dragging the black squares in the corners. You can also adjust the size more precisely under Photo Properties.
6. Add the Overlay Image: Under Paper Properties, click the paper clip next to Overlay, and select the overlay image you created and saved.
7. Adjust Photo Boxes if Necessary: If needed, adjust the photo boxes to fit perfectly with the overlay.
-

Layout in Sparkbooth Layout Editor

8. Preview the Layout: Press the Preview button (eye icon) to test the layout.
By following these steps, you can create and use custom backgrounds and overlays in Sparkbooth, enhancing the experience for your photo booth users.